I’ve spent three summers turning a cracked concrete slab into something I’m genuinely proud of. Everything in this article is something I’ve actually done — including the stuff that didn’t work the first time.
When we bought our house, the backyard patio was — and I’m being generous here — depressing. Bare concrete, a cracked section in the corner, one sad patio umbrella with a broken rib that listed to the left in any breeze. We ate outside exactly once that first summer, got eaten alive by mosquitoes with nothing blocking the neighbors’ view, and went back inside to eat at the kitchen table for the next three months.
I’ve spent the three summers since then fixing it. Not all at once — that’s not how it actually works for most people. One project at a time, one season at a time. String lights one spring. A proper outdoor rug and new furniture the following summer. The pergola the summer after that, which took three weekends and a lot of YouTube and was the best thing we ever did out there.
These 17 outdoor patio makeovers are everything I’ve learned and done across those three years. I’ve included real costs in US dollars because most advice online either skips pricing entirely or uses suspiciously round numbers. These are what things actually cost when you go buy them.
Why Your Patio Probably Isn’t Getting Used
Here’s the honest answer: most unused patios have nothing to do with the patio itself. They have to do with three things — no shade so it’s too hot, no privacy so it feels exposed, and no atmosphere so there’s no reason to stay out there once dinner is done. Fix those three things and you’ll use the patio. Leave them unfixed and it doesn’t matter how nice the furniture is.
Everything below addresses at least one of those three problems. Some address all three. I’ll tell you which as we go.
How to Plan Your Outdoor Patio Makeovers
Before you buy anything: walk out to your patio at the time of day you’d most want to use it. For most people that’s late afternoon or early evening. Stand there for five minutes. What’s uncomfortable? What’s missing? Is it too hot? Too exposed? Too dark once the sun goes down? Too bare?
Make a short list — literally three to five things. That’s your makeover plan. Budget comes next: figure out what you can spend total and split it roughly — 40% on furniture if you need new seating, 30% on shade or structure, 20% on lighting and plants, 10% on smaller decor and accessories. That rough split has worked well for me and a few friends who’ve redone their patios. Adjust based on what your space actually needs.
Now — the 17 ideas.
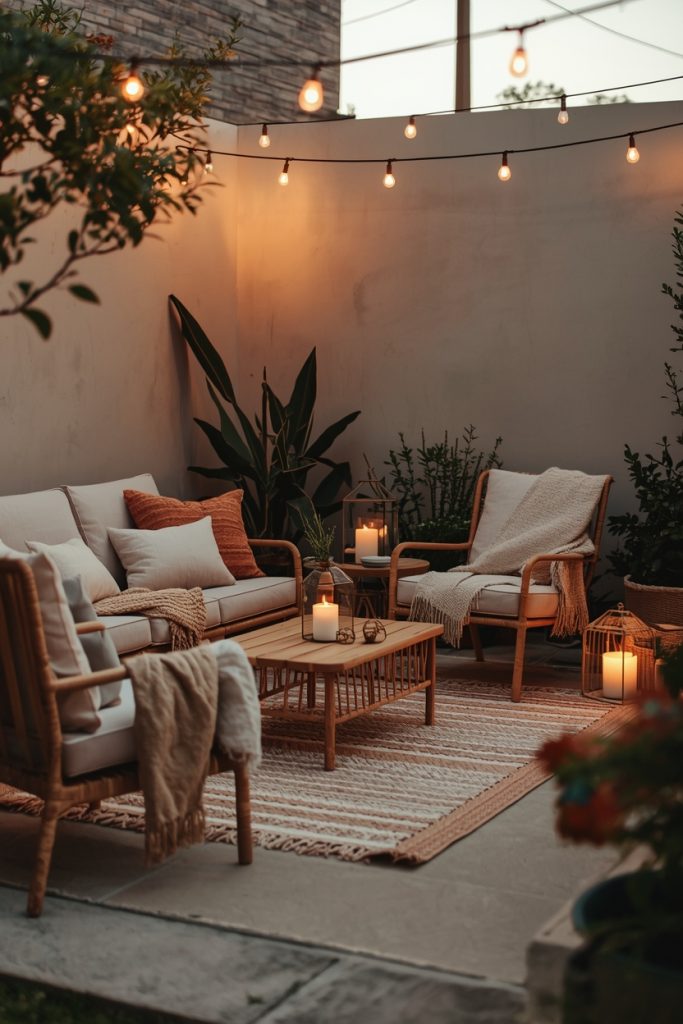
1. Outdoor Patio Makeovers with String Lights
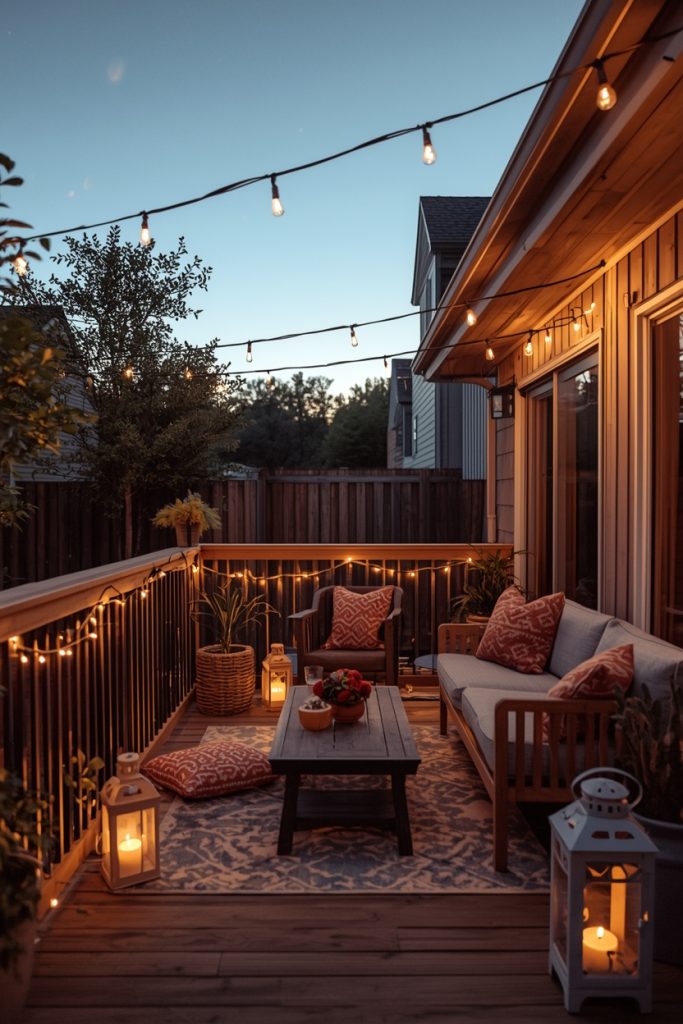
String lights were the first thing I did out there and honestly they had more impact than anything else I’ve spent three times as much on. The patio went from “concrete slab” to “place you want to be after dinner” the first evening I switched them on. My wife walked out, saw them, and said “okay now I get it.”
The setup I use: café-style Edison bulb string lights, warm white, about 48 feet total strung in a zigzag pattern overhead. I ran a couple of eye hooks into the fence posts at each corner and one into the side of the house. The whole overhead canopy cost around $35–$45 for the lights — I used the Brightown outdoor string lights from Amazon. The S14 bulb style (the larger vintage Edison ones) creates a warmer, more romantic glow than the small globe style lights, especially after dark.
One practical thing I learned the hard way: use a heavy-gauge outdoor-rated cord and hang the lights tight enough that they don’t sag dramatically but loose enough to absorb the expansion and contraction in extreme heat and cold. My first attempt at stringing them sagged about 18 inches in July’s heat and looked terrible. Tighter tension when hanging — a small detail that makes a big visual difference.
Plug-in timer: A $9 outdoor plug-in timer from Home Depot is worth every cent. Set it to come on at dusk automatically. Walking out and having the lights already on feels like a completely different experience than having to remember to turn them on every evening.
Amazon Product to Shop:
1- Brightown 48FT Outdoor String Lights (S14 Edison Bulbs, Warm White) – Shop on Amazon
2- BN-LINK Outdoor Plug-In Timer (Waterproof, Dusk to Dawn) – Shop on Amazon
2. Budget-Friendly Outdoor Patio Makeovers Ideas
The summer after we moved in I had maybe $200 to spend on the patio and I wanted to see how much difference that could make. Turns out: a lot. Here’s roughly how that $200 went. An outdoor rug from Ruggable — $79 for a 5×7. String lights — $38. Two big bags of potting mix and a flat of annuals from Home Depot — $32. A can of Rust-Oleum spray paint in matte black to refinish the two beat-up patio chairs that came with the house — $8. Replacement outdoor cushions from IKEA — $34 for two.
Total: $191 and change. The transformation was genuinely embarrassing compared to what was out there before. The chairs that looked ready for the trash looked intentional and modern after the matte black spray paint. The rug anchored the whole seating area so the furniture looked placed rather than randomly parked on concrete. The plants brought color and life. The string lights handled the evenings.
The spray paint trick specifically — this is one I’ll keep recommending. Old metal patio furniture that’s rusty or faded doesn’t need replacing. Sand off the loose rust with $3 worth of sandpaper, wipe it down, spray with a rust-inhibiting outdoor paint. Two coats. The chair looks like new in about forty minutes of actual work.
Skip the cheap patio sets at grocery stores: The $99 plastic patio sets you see at grocery stores and drugstores in summer are a waste of money. They look cheap immediately, fade within one season, and feel unsteady. Save those dollars toward a secondhand metal or resin wicker set from Facebook Marketplace instead — far better quality for the same price or less.
3. Small Outdoor Patio Makeovers for Limited Space
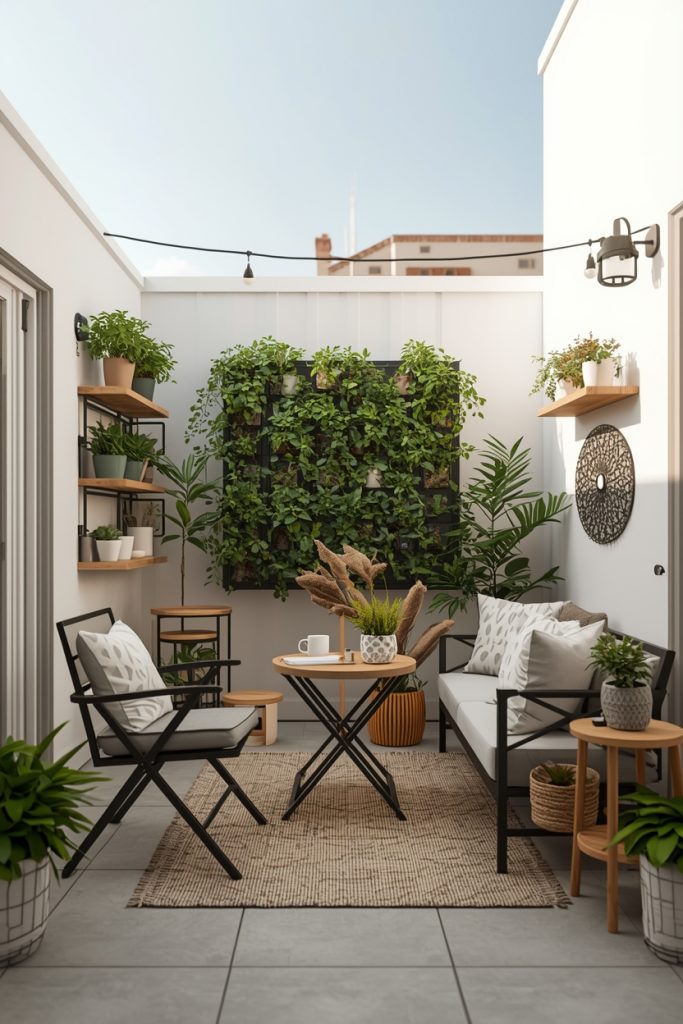
Our old apartment had a balcony patio that was about 6 feet by 8 feet. That’s 48 square feet. Fitting anything useful out there felt like a puzzle at first. But eventually I had it set up in a way that fit a small bistro table and two chairs, a vertical planter with herbs, a string of lights along the railing, and a small side table. Felt like a private café. Had friends visit and they asked if they could take a photo out there.
The key for small spaces is vertical thinking. Wall-mounted planters instead of floor pots. A folding bistro table that can be pushed against the wall when not in use ($60–$80 at most home stores). Railing planters rather than freestanding ones. String lights along the top of the railing or overhead rather than floor-level path lights that just eat up ground space.
A small outdoor rug — even a 3×5 under the bistro set — defines the space and makes it feel intentional rather than cramped. The difference between furniture sitting on bare concrete and furniture sitting on a rug is surprisingly dramatic. The rug signals “this is a designed area” rather than “furniture stored outside”.
Furniture scale matters more in small spaces: One properly-sized bistro set looks better than two chairs that are technically smaller but still too large for the space. Measure your patio before buying anything — a lot of outdoor furniture looks smaller on the showroom floor than it does in a real 6×8 space.
4. Modern Outdoor Patio Makeovers Design
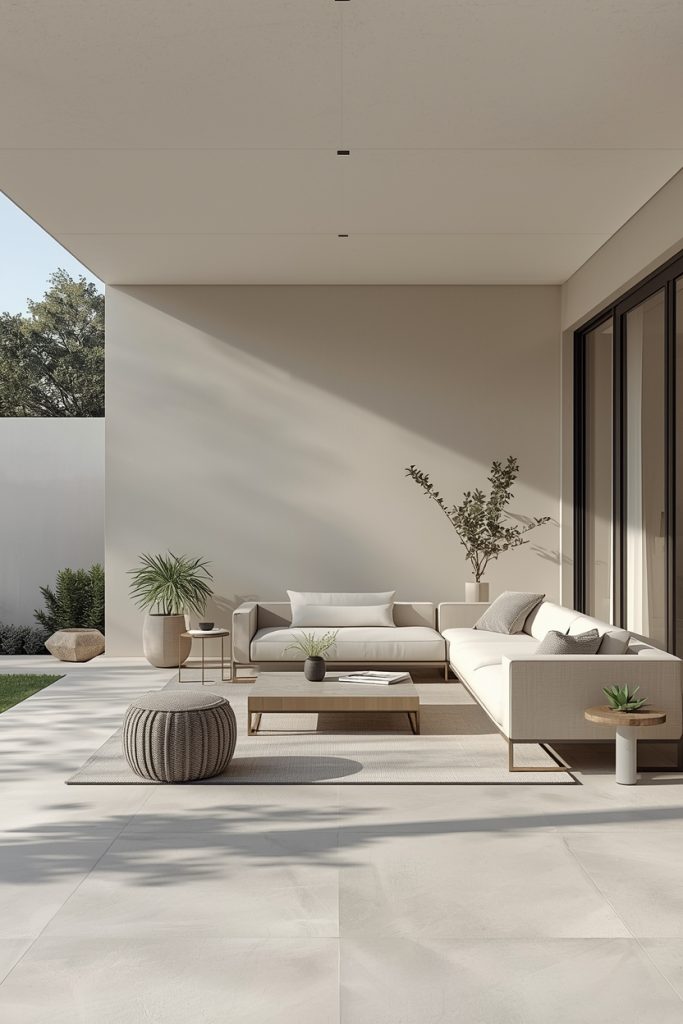
My neighbor did a modern patio makeover last summer that made me genuinely envious for about two months. She kept it simple: matte black metal furniture with clean straight arms, neutral grey cushions, two large black ceramic pots with ornamental grasses, concrete stepping stones laid in a grid pattern over the existing slab, and not a single decorative object beyond the plants. That’s it. The whole thing cost her about $650 and it looked like a professional landscaper designed it.
The formula for modern outdoor design is actually easier than most styles: pick one accent color (she used black for all metal elements), keep everything else neutral (grey and concrete tones), use plants as the only organic element, and resist adding stuff. The restraint is the design. Every time she considered adding something new, she asked herself whether it had a clean line or a natural organic shape — if neither, it didn’t come out there.
Concrete pavers laid over an existing slab are one of the best budget-modern upgrades available. Lowe’s and Home Depot both carry 12×12 inch concrete pavers for about $1.50–$2 each. For an average 10×12 patio you’d need around 120, which runs $180–$240 total. Lay them in a grid with a half-inch gap, fill the joints with polymeric sand ($18 a bag), and the cracked or stained concrete underneath disappears completely.
You may also Like: Unbelievable 15 Garden Trellis Ideas for Climbing Plants – 15 Trellis Ideas for Garden to Transform Your Outdoor Space
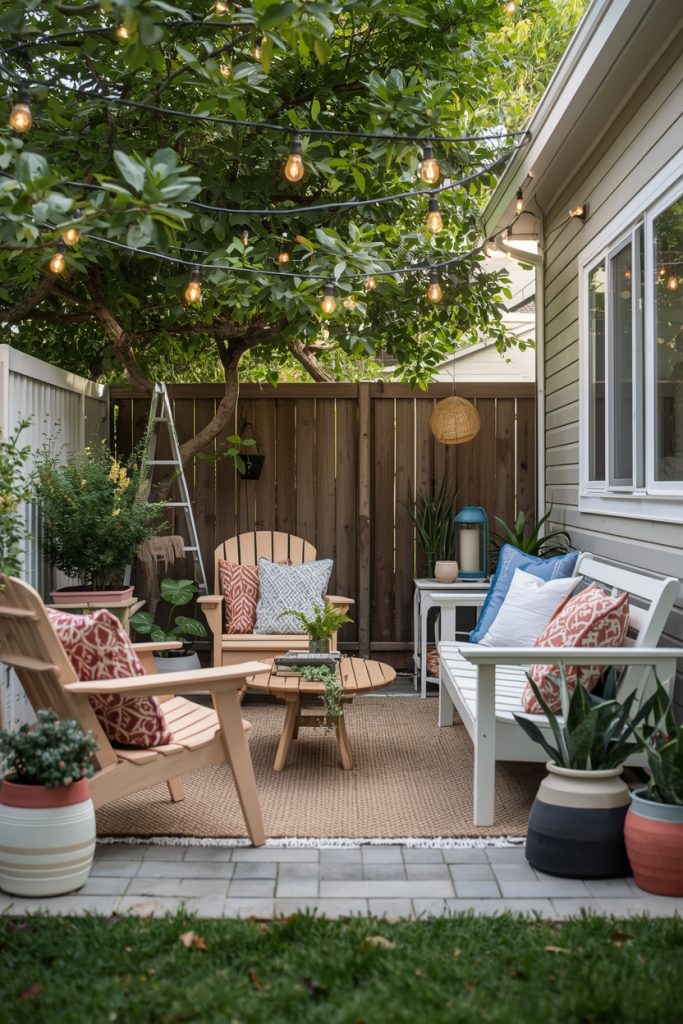
5. Cozy Outdoor Patio Makeovers Setup
The cozy patio setup is what I ended up with and what I’d recommend most people aim for, because cozy is what actually makes you use the space. A patio that looks great in photos but isn’t comfortable to sit on for two hours is a patio you won’t use. Cozy means comfortable seating first, atmosphere second, aesthetics third.
What cozy looks like outside: a sectional or deep loveseat with thick outdoor cushions (the cushion thickness matters — get at least 3-inch foam, not the thin pad stuff), side tables at the right height for drinks, soft lighting rather than harsh overhead fixtures, and a few plants or lanterns at ground level rather than all overhead. I added an outdoor throw blanket — yes, outside — specifically for cool evenings. Hung it over the back of the loveseat. Got used more than I expected.
Outdoor sectionals have come down dramatically in price. A decent 3-piece resin wicker sectional with cushions runs $350–$600 at places like World Market, Wayfair, or Costco during summer sales. That’s a significant purchase, but if it means you actually use your patio every evening from May through October, it’s a different calculation than spending $350 on furniture that looks nice but doesn’t get sat on.
6. Outdoor Patio Makeovers with Plants & Greenery
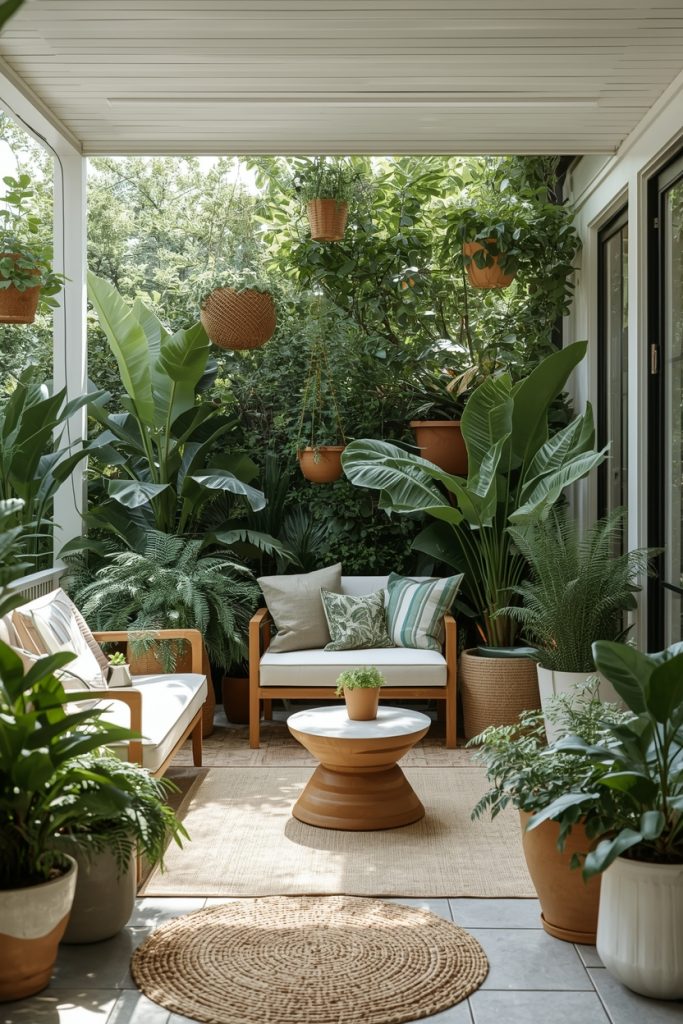
I have killed probably thirty plants on my patio across three summers. Not an exaggeration. I now have a much more realistic sense of what survives in my specific situation (full afternoon sun, central Texas heat, frequent travel where watering gets missed) versus what I wishfully buy because it looks good at the nursery. Let me save you some of those plant funerals.
What reliably survived in a hot, full-sun patio situation for me: elephant ear in a large pot (dramatic, fast-growing, loves heat), lantana (blooms all summer, near indestructible), rosemary (thrives in sun and drought, smells amazing when you brush against it), ornamental grasses, and sweet potato vine as a spiller in mixed pots. What repeatedly died despite my best efforts: lavender (too much humidity), most herbs except rosemary and basil, and any fern I have ever optimistically purchased.
For a genuinely impactful plant setup: go large rather than many small. Two large pots — 18 inches or more — with bold plants make more visual impact than ten small pots scattered around. Large pots also retain moisture better, which means you’re watering less and killing fewer plants. A good-sized ceramic or resin pot runs $25–$60. Worth it compared to replacing ten $8 pots’ worth of dead plants every season.
Self-watering planters: If you travel or just forget to water (same), self-watering pots with a reservoir at the bottom are genuinely game-changing. The Lechuza brand runs $40–$80 depending on size, stores enough water to keep most plants going for a week without attention, and has saved more plants than I can count.
7. DIY Outdoor Patio Makeovers Projects
I’m not a woodworker. I want to be clear about that. My comfort level is basically “I can drive a screw without stripping it most of the time.” So the DIY projects I’m recommending here are the ones that don’t require advanced skill, don’t require a table saw, and won’t fall apart on you in six months. I have done all of them personally.
Painted concrete floor ($35–$55 total): Concrete patio paint from Home Depot, a roller, one afternoon. The transformation is significant. We used a warm grey-brown tone. Apply a concrete etching solution first ($8 at any hardware store) so the paint bonds properly — skip this step and it peels by summer’s end.
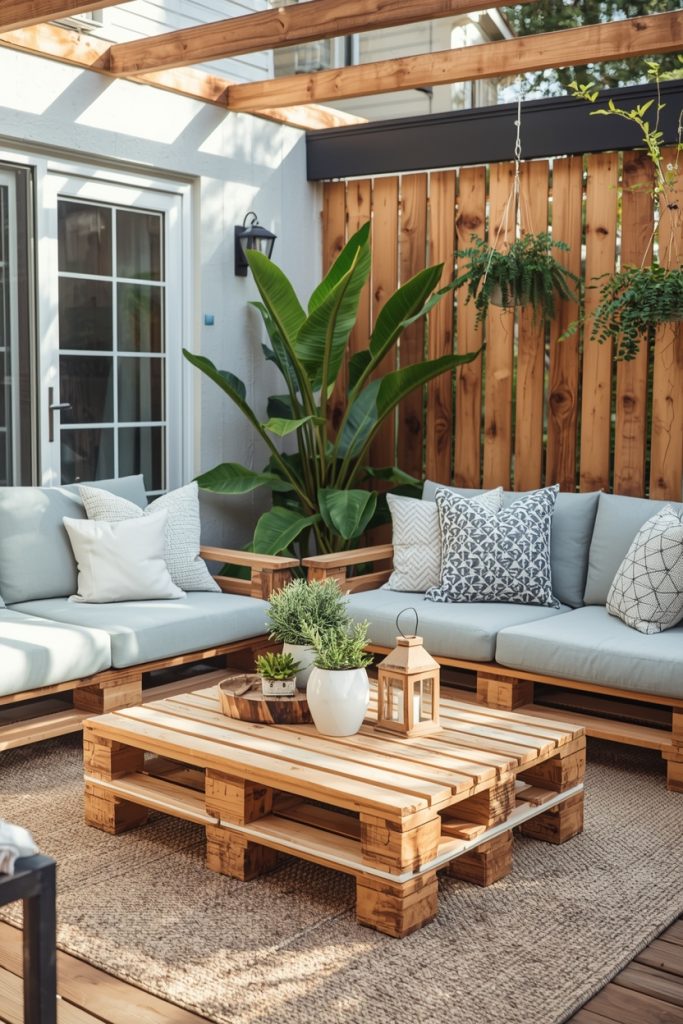
Planter bench from concrete blocks and lumber ($60–$80 total): Stack two courses of standard cinder blocks ($1.50 each at Home Depot) and lay a 2×10 cedar plank across them. That’s the bench. Add a second stack slightly taller with soil on top and you have a raised planter beside your seating. Cedar plank runs about $18–$25 for an 8-footer. The whole thing takes about 45 minutes and zero power tools.
Cedar privacy screen ($45–$90 depending on size): Cedar fence pickets, a couple of posts, basic framing screws. I built a 6-foot-wide, 5-foot-tall privacy screen along one side of our patio in an afternoon. Cedar weathers beautifully, doesn’t need painting or staining, and the natural wood smell in summer is genuinely pleasant.
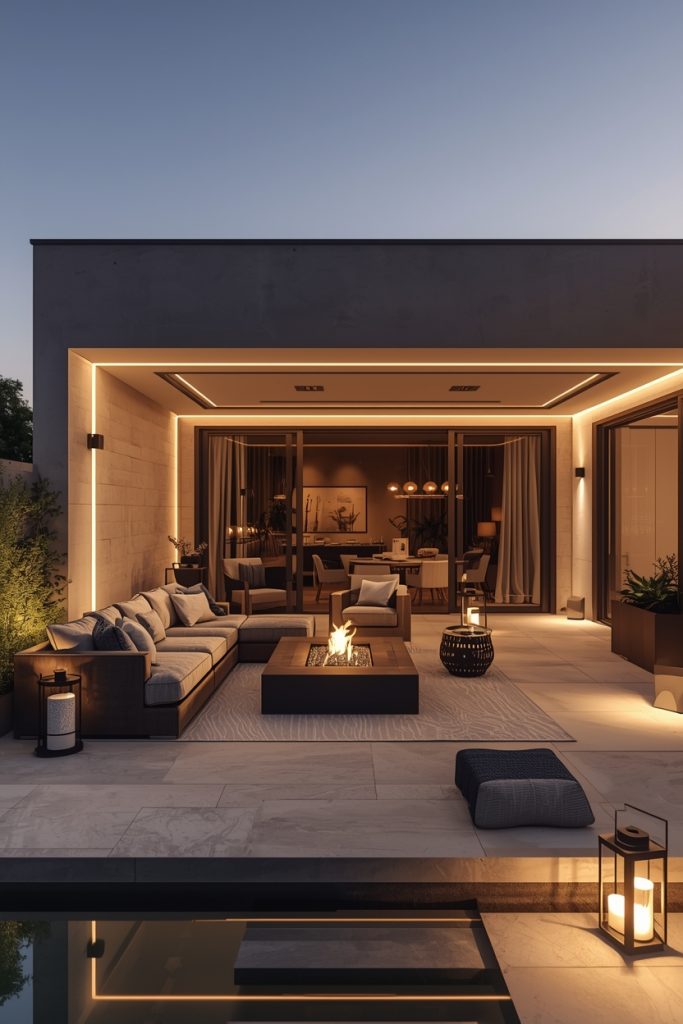
8. Outdoor Patio Makeovers with Pergola or Shade
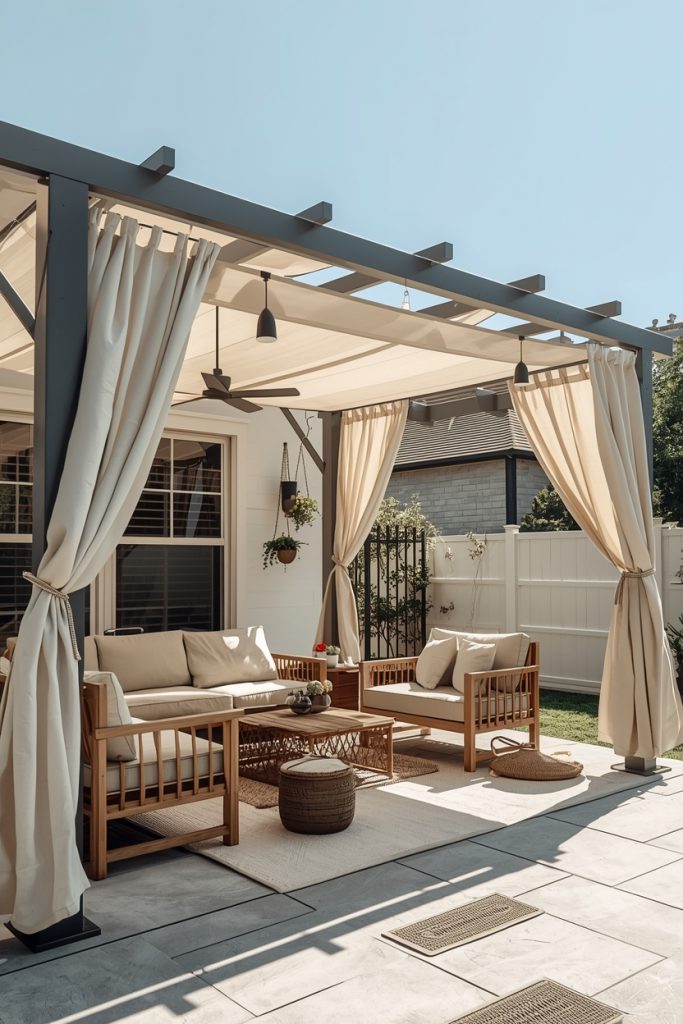
The pergola was the project I kept putting off because it felt like too much — too much money, too much work, too much commitment for a space I wasn’t sure about yet. I finally built one in the third summer and within about a week I genuinely couldn’t remember what the patio felt like without it. It completely changed the space.
What I built: a freestanding cedar pergola kit from Lowe’s, 10×12 feet, no-dig anchors drilled into the existing concrete. The kit was $650. Anchors and hardware were another $80. I did the whole build in two weekends with my brother-in-law (who is actually handy, which helped). Adding shade sail fabric across the top — $55 at Amazon — means real shade from about noon through mid-afternoon when the sun is brutal.
If a full pergola build isn’t in the budget this year, a sail shade on its own makes a massive difference. Three steel posts ($15–$20 each at Lowe’s) cemented into the ground or mounted to fence posts, one triangular shade sail ($45–$80 depending on size), and you’ve got real shade in one afternoon. That’s the version I’d recommend to anyone who just needs the sun problem solved fast.
Free-standing pergola vs. attached: If you’re anchoring a pergola to your house, most municipalities require a permit. Freestanding — anchored only to the ground — usually doesn’t require one. Check with your local building department before you start. I didn’t check the first time and had to move two anchor points.
9. Luxury Outdoor Patio Makeovers Ideas
My sister has the most impressive patio I’ve ever spent time on and the thing that surprised me when she told me the total cost was that it wasn’t as much as I expected. She spent about $3,500 over two years — which sounds like a lot until you consider that her patio is basically an outdoor living room she uses nine months of the year. The cost per use, spread over years, is genuinely reasonable.
What she invested in: a Polywood deep seating set ($1,200 — Polywood is expensive upfront but genuinely lasts 20+ years, comes with a warranty, and never needs cushion replacement because the material itself is weather-proof). A small outdoor kitchen counter unit with a built-in burner and a mini fridge ($800, IKEA KLASEN line with add-ons). A cedar pergola similar to mine. String lights on a smart dimmer ($55 total). Large ceramic pots with ornamental trees ($180 for two).
The luxury patio lesson: spend on structure and seating, save on accessories. A $1,200 furniture set and a $200 pergola looks better and lasts longer than a $400 furniture set and a $1,000 fireplace table you’ll use twice. Durability is the real luxury in outdoor spaces.
10. Outdoor Patio Dining Area Makeovers

We didn’t eat outside consistently until we set up a proper dedicated dining area. Before that, eating outside meant bringing chairs over from the seating area, balancing plates on unstable surfaces, and generally making it more work than it was worth. Once we added a proper outdoor dining table with actual chairs that stayed in one place — we ate outside five nights a week all summer.
What made it work: a round 48-inch outdoor dining table (round is better for conversation and for tight spaces — no one ends up at the “head” of the table staring at the grill) for $185 from Wayfair. Four matching stackable metal chairs, $35 each from Target’s outdoor furniture section. An outdoor tablecloth in a stripe that matched our chair cushions — $22. String lights overhead specifically over this area, so there’s a pool of warm light at dinner rather than general ambient glow.
The one upgrade that changed outdoor dining most: a small side cart or rolling bar cart beside the dining area. Around $75 at HomeGoods or Walmart outdoor section. It holds the condiments, extra napkins, a small speaker, cold drinks, and whatever else you need during a meal — so you’re not running in and out of the house six times. Once that friction disappeared, eating outside became the default rather than the exception.
11. Boho Style Outdoor Patio Makeovers
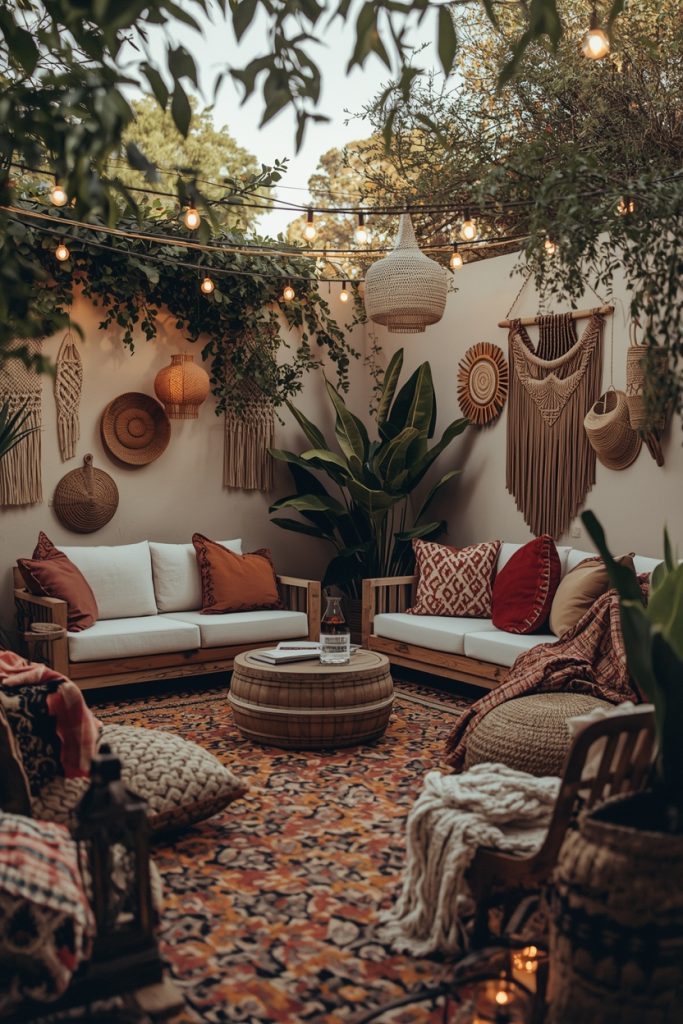
My neighbor two houses down has the most visited patio on our block because she did a boho setup that looks like a resort in Portugal somehow ended up in suburban Ohio. People ask about it constantly. She told me her total budget was about $400, which I still find impressive every time I sit out there.
Here’s what she used: two rattan egg chairs from Amazon ($120 for the pair on sale — the kind that hang from a stand or a tree branch). A macramé wall hanging mounted on the fence ($38 on Etsy). A mix of outdoor cushions in terracotta, warm yellow, and cream ($12–$18 each, mix from HomeGoods and TJ Maxx). Rattan lanterns in different sizes on the ground and on a small table ($8–$22 each, several from Amazon and the World Market sale section). Woven outdoor rug — $55.
The boho approach is actually one of the most forgiving outdoor styles because mixing is the point. Things don’t need to match — they need to share a warm, natural color family (terracotta, amber, cream, warm green) and use natural or natural-looking materials (rattan, jute, macramé, wicker). If you’re shopping secondhand or picking things up gradually, the eclectic accumulation adds to the aesthetic rather than fighting it.
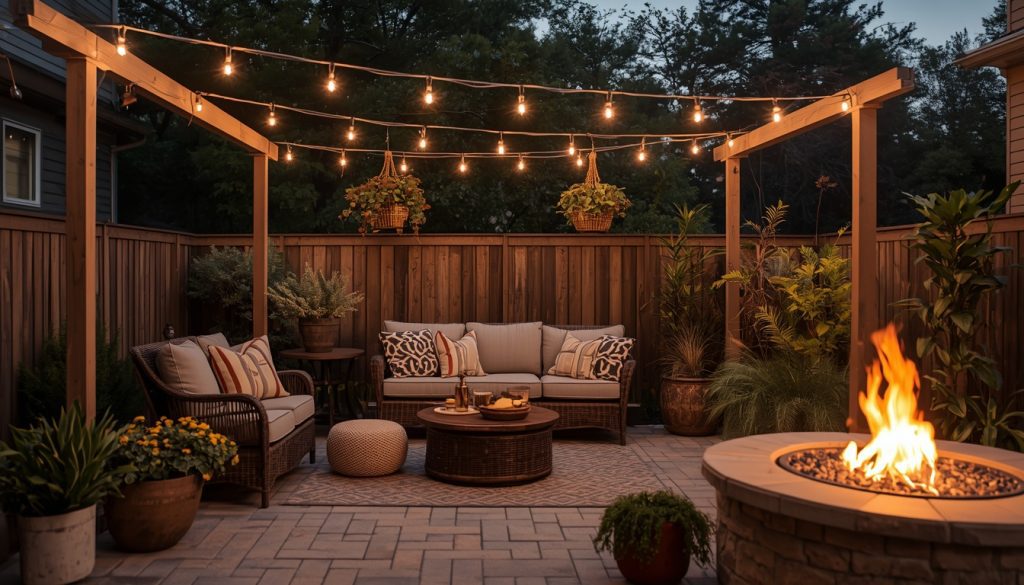
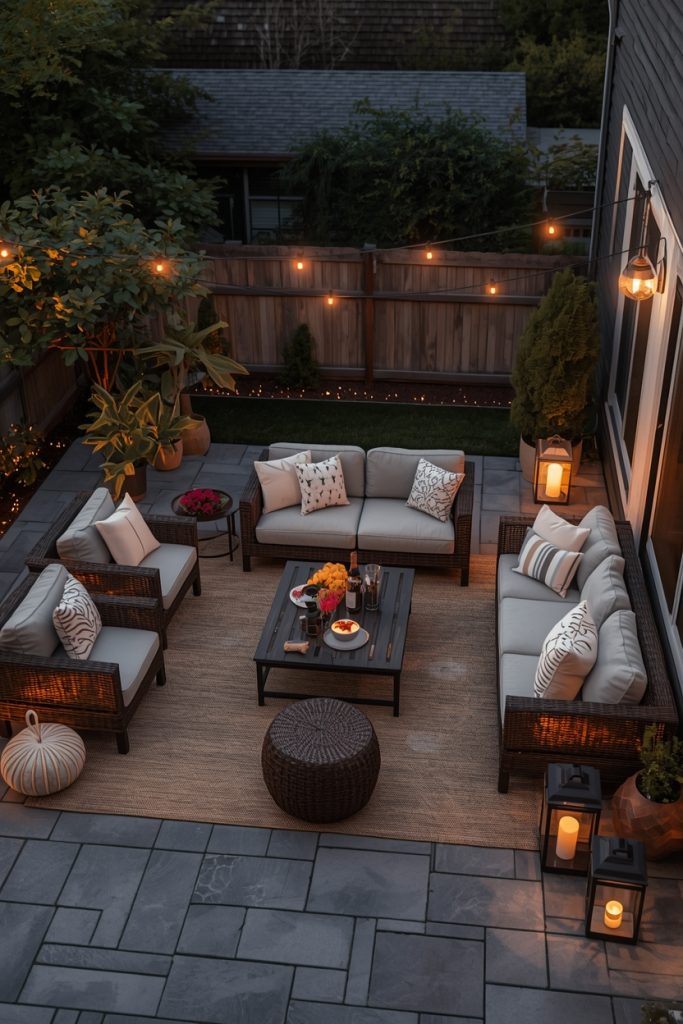
12. Outdoor Patio Makeovers with Fire Pit
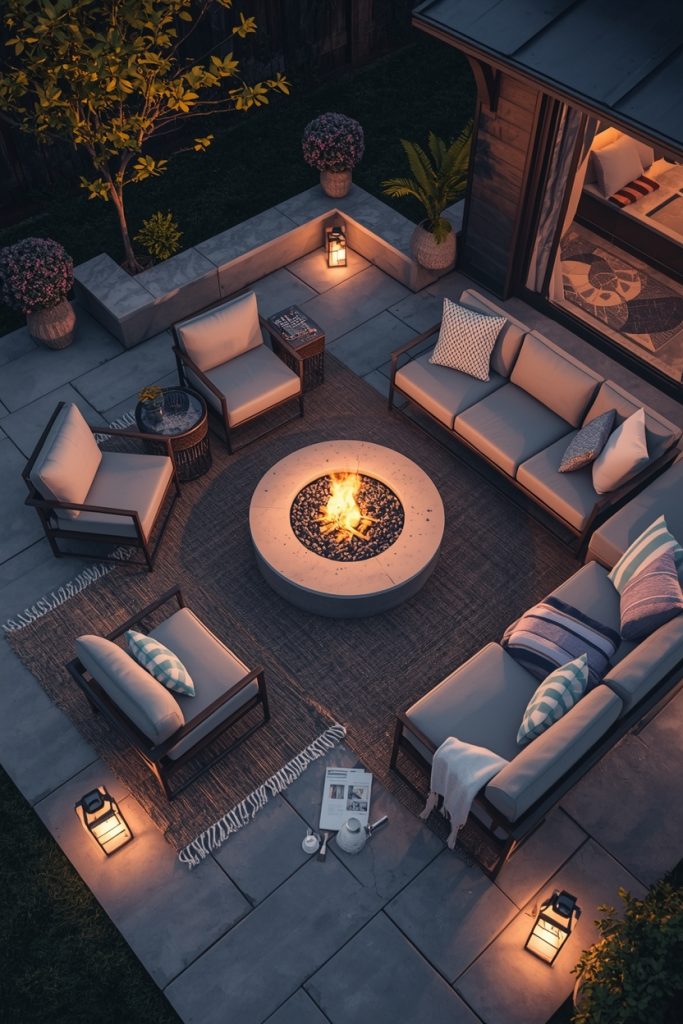
Adding a fire pit to our patio is the single most-used upgrade we’ve made. Not a decorative one — an actual wood-burning fire pit that gets used from late September through November and again in March and April when the evenings are cool. The fire pit season is legitimately the best time to be on our patio.
We have a 36-inch steel fire pit bowl on legs from Home Depot — $89. Around it: four Adirondack chairs at $55 each from the Hanover brand on Amazon (solid wood, not the cheap plastic versions). Total seating circle setup including the fire pit: about $310. That’s it. No elaborate hardscaping, no gas line — just a bowl, some good chairs, and a cord of wood that lasts two seasons.
Things I wish I’d known: buy a spark screen for the fire pit immediately ($15–$25). We skipped it the first season because we thought it looked better without it and put a small burn mark in one of our wooden deck boards when a spark popped out. Also check your local regulations — most suburban areas allow wood-burning fire pits but some HOAs or municipalities don’t. My neighbor one street over got cited because hers was too close to the fence line. Five feet from any structure is the typical minimum clearance.
Propane option: If open fire isn’t allowed in your area, a propane fire pit table — about $200–$350 at Lowe’s or Wayfair — gives you the atmosphere without the regulations issue. Less authentic but still genuinely useful for extending the outdoor season into cooler evenings.
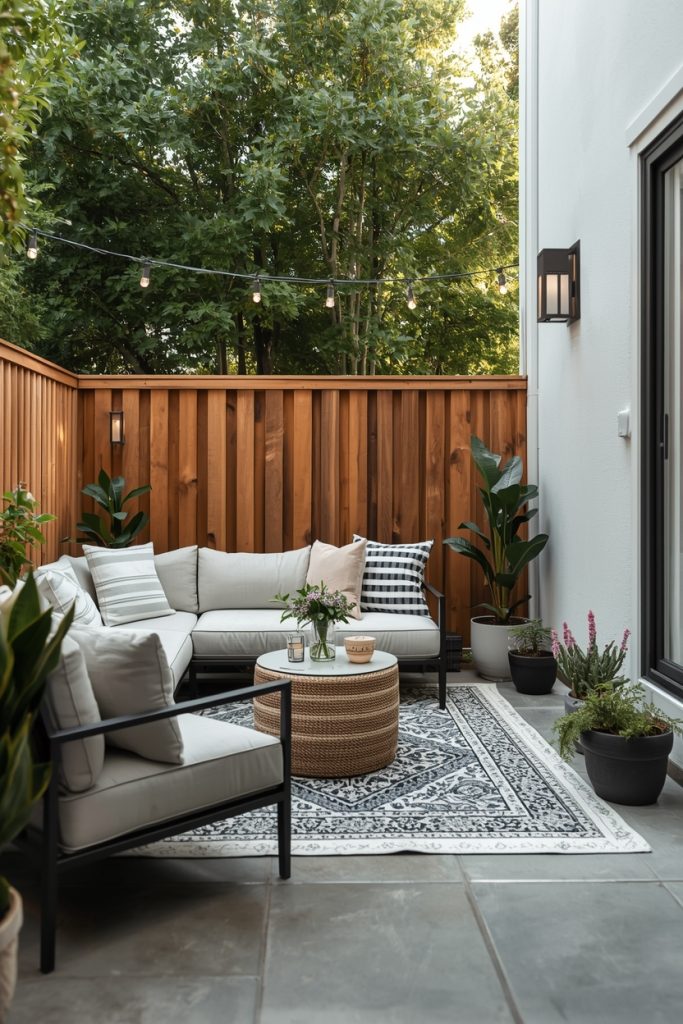
13. Outdoor Patio Privacy Ideas
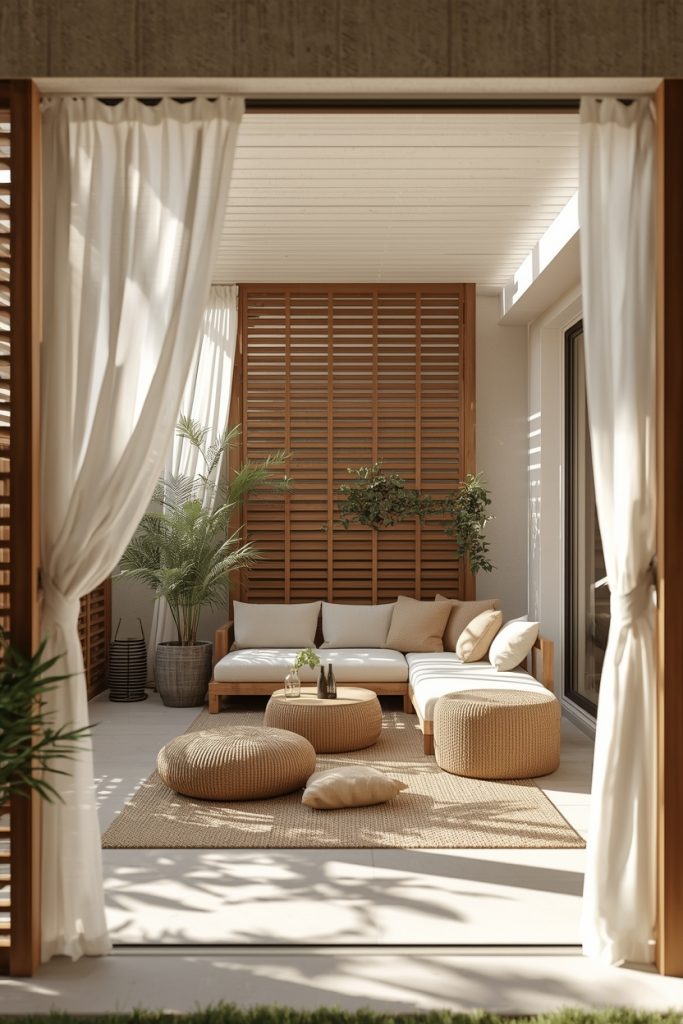
Privacy was actually the thing that was keeping us from using our patio comfortably. Our next-door neighbor’s house is close — their kitchen window looks directly onto our patio area. For the first two years we felt vaguely on display every time we were out there. It was subtle but it changed how relaxed we felt. Once we put up a cedar screen along that side, the whole feeling of the patio changed. More enclosed. More private. More like ours.
Three privacy solutions I’ve actually tried, from most affordable to most involved:
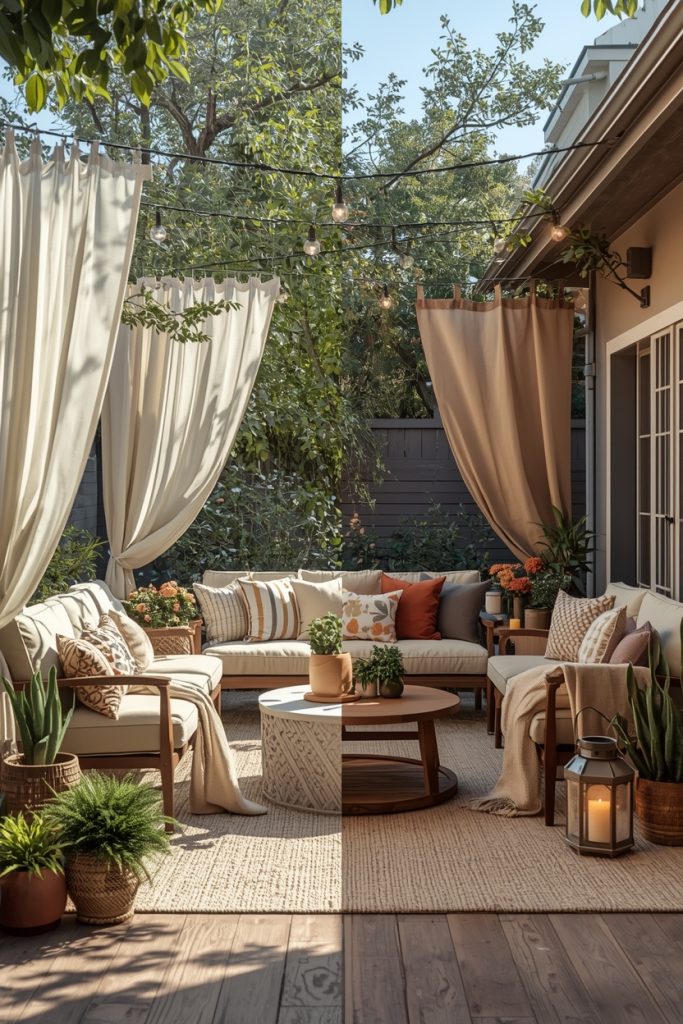
Outdoor curtain panels ($60–$90 total): Curtain wire strung between two posts with outdoor curtain panels. Gives soft privacy, moves in the breeze, looks beautiful in photos. The downside: not effective in windy areas and you need to take them down in heavy weather. Works well in mild climates.
Cedar privacy screen ($80–$120 depending on size): The DIY version I described in the DIY section — cedar fence pickets, framing lumber, screws. This is what I built and what I’d recommend for most people. Solid privacy, looks natural, weathers to a beautiful silver-grey over two seasons without any maintenance.
Bamboo with lattice and climbing plants ($150–$200 for a 10-foot stretch): The most attractive long-term option. Takes one season to look established. Bamboo screen from a garden center, lattice panels for the climbing plants to grab onto, and a fast-growing annual climber like morning glory or clematis. By midsummer you have a living green wall.
14. Outdoor Patio Makeovers with Outdoor Rugs
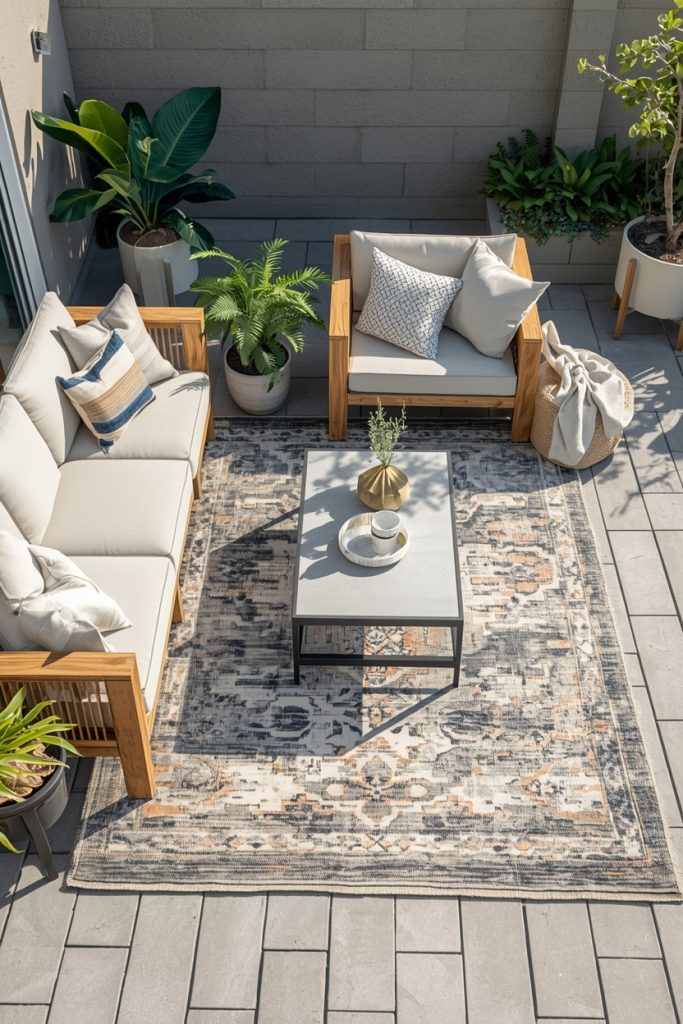
An outdoor rug is the single most underrated patio upgrade. I skipped it for the first summer and kept wondering why the patio felt unfinished despite having decent furniture. Added a rug in year two and immediately understood what was missing. The furniture went from “stuff parked on concrete” to “a designed outdoor room.”
The rules for outdoor rugs are basically the same as indoor rugs: size up. If you think you need a 5×7, get a 6×9. The bigger rug almost always looks better. At minimum the front legs of your main seating should sit on the rug — same rule as indoors. If the chairs are floating completely off the rug, it looks like the rug is an island rather than the foundation for the space.
Where to buy: Ruggable makes washable outdoor rugs that are genuinely good for patios — a 5×7 runs about $110–$160 depending on the design and frequent sales. HomeGoods and TJ Maxx reliably have decent outdoor rugs for $50–$90 if you’re patient enough to check in regularly. Amazon has a huge selection but the quality is more variable — check the reviews carefully for anything under $60.
Material matters for longevity: polypropylene (the most common outdoor rug material) handles rain and sun well but will eventually fade in direct UV if you’re in a very sunny climate. For full-sun patios, look for rugs specifically labeled UV-resistant or spend a little more on a better quality polypropylene. Thin rugs on concrete will also curl at the corners — rug grippers from Amazon ($12) solve this.
15. Seasonal Outdoor Patio Makeovers Ideas
One of the best decisions I made for our patio was treating it as a seasonal space that shifts throughout the year rather than a static setup that looks the same in July as it does in October. The shift doesn’t require new furniture — mostly it’s about swapping cushion covers, changing the plants, adjusting the lighting, and adding or removing elements based on the temperature and mood of the season.
Spring setup: Bright cushion covers in yellow or green, fresh annuals in the pots, solar path lights along the edges, the patio table out for outdoor meals as soon as evenings are consistently above 55°F.
Summer setup: The full outdoor living room — sectional fully cushioned, string lights on the timer, potted plants at peak, shade sail deployed, dining table in regular use.
Fall setup: This is my favorite. Swap the bright cushions for warm terracotta and cream tones ($20–$25 for cushion covers, leaving the inserts in place). Add a few mums in pots ($5–$8 each at any hardware store or farmer’s market). Bring out the fire pit. Add a couple of outdoor lanterns with battery candles. The patio shifts from summer-light to autumn-warm and extends the outdoor season significantly into October.
Cushion storage tip: The biggest obstacle to seasonal patio transitions is cushion storage. A weatherproof outdoor storage bench ($65–$120 at Home Depot) that doubles as seating holds four to six cushions and means your seasonal swap is a twenty-minute job rather than a major undertaking involving the garage.
16. Outdoor Patio Makeovers for Entertaining Guests
We hosted our first backyard party the summer after we finished the patio and realized pretty quickly that the setup that works well for two people doesn’t automatically work for twelve. A few things I added or changed specifically for entertaining that made a big difference:
A dedicated drink station: A small rolling cart or a folding table set up specifically as a drink station keeps people from congregating in your kitchen. Bags of ice in a cooler, drinks, cups, and basic barware. The $45 rolling cart from Walmart that lives beside our dining area does this job perfectly — it rolls out of the way when not in use and becomes the drink station in about sixty seconds.
Extra seating that stores away: I keep four folding Adirondack chairs ($28 each on Amazon — the HDPE plastic ones that look like wood and fold flat) in the garage specifically for parties. They fold to about 4 inches thick and stack against the wall. When we have people over they come out. When it’s just us they disappear. This solved the “enough seating for a party” problem without the patio looking crowded on regular evenings.
Outdoor Bluetooth speaker: The JBL Clip 4 ($60 at Best Buy) or the TREBLAB HD77 ($45 on Amazon) both provide surprisingly good outdoor audio for a small to medium patio gathering. Not a party speaker — but for background music during a dinner party or casual hang, more than sufficient. Weather-resistant, charges via USB, clips to a pergola post or sets on a table.
17. Simple Weekend Outdoor Patio Makeovers
If you want to tackle this all in one weekend, here’s exactly what I’d do with $200 and a Saturday-Sunday available. This is the fast version — not the complete long-term transformation, but enough to make the patio feel genuinely different by Sunday evening.
Saturday morning ($0–$20): Power wash the concrete if you have a pressure washer or can borrow one. If not, a $6 bottle of outdoor concrete cleaner and a stiff brush works. Clean furniture with a damp cloth and mild soap. Let everything dry while you plan the layout. Move furniture around without buying anything first — sometimes a rearrangement alone changes the feel significantly.
Saturday afternoon shopping ($140–$165): Outdoor rug 5×7 from HomeGoods or TJ Maxx ($55–$80). One set of warm white string lights $35–$40. Two 2-gallon pots of color — whatever annual is on sale at the garden center, about $8–$12 each. If furniture cushions are faded or flat, two replacement cushion sets: $18–$25 each depending on size.
Saturday evening setup (2 hours): Lay the rug and position furniture on it. String the lights. Plant the annuals in whatever pots you already have. Put out the cushions. That’s the core of it done.
Sunday (refinements): Anything that needs a second look after sleeping on it. Maybe a lamp or lantern to fill a dark corner. Maybe one of those cheap potted plants needs a better pot ($8 terracotta from Home Depot). Hang any wall element — a small outdoor mirror, a simple sign, or just a hook with a hanging planter.
Sunday evening you sit outside with a drink and it feels like a different space. Not perfect — that takes longer — but genuinely better. Worth the $200 and the weekend. That’s how all of our best patio projects started.
Outdoor Patio Makeovers Mistakes to Avoid
I’ve made most of these. Some more than once.
❌ MISTAKES I MADE SO YOU DON’T HAVE TO
- Buying cheap outdoor cushions. The $12 outdoor cushion cover gets flat in six weeks, fades badly, and smells musty after one rain. Spend at least $20–$25 per cover — Sunbrella fabric or Sunbrella-equivalent is worth the extra cost and lasts for years.
- Undersizing the rug. An outdoor rug where only the coffee table fits on it — and all the chairs float off the edge — makes the whole space look worse. Get the bigger size.
- Planting in undersized pots. A 4-inch pot with a plant that wants to be 3 feet tall. It looks sad and dries out constantly. Go at least 12 inches in diameter for anything substantial.
- Skipping the timer for string lights. If you have to remember to turn them on, you’ll forget half the time and they’ll sit dark. A $9 timer solves this permanently.
- Using indoor furniture outside. That wicker side table from the living room will be ruined by one season of outdoor exposure. Only furniture rated for outdoor use belongs outside — the materials are genuinely different.
- Installing a pergola without checking local regulations first. Most areas are fine with freestanding structures under a certain size. But find out before you build, not after.
- Buying a fire pit without checking HOA rules. Some neighborhoods prohibit open burning. Five minutes of reading your HOA guidelines or calling your municipal code enforcement saves a potential fine.
Quick Outdoor Patio Makeovers Checklist
✅ WEEKEND PATIO MAKEOVER — THE ORDER THAT MAKES SENSE
- ◻ Power wash or clean the patio surface
- ◻ Decide on primary use: lounging, dining, or both
- ◻ Set a total budget and rough category splits
- ◻ Arrange existing furniture before buying anything new
- ◻ Add or replace outdoor rug — size up from your instinct
- ◻ Hang string lights — warm white, on a timer
- ◻ Add shade solution if sun is a problem (sail shade first, pergola later)
- ◻ Replace or refresh cushion covers
- ◻ Plant two large pots — choose sun-appropriate plants for your climate
- ◻ Add privacy element if needed (curtains, screen, or bamboo)
- ◻ Add lanterns or ground-level lighting for evening depth
- ◻ Consider a side cart for drink storage near dining area
- ◻ Final edit — remove anything that looks out of place or is never used
Conclusion
The patio that now makes me genuinely happy to walk out onto every morning with my coffee was a bare concrete slab three summers ago. It didn’t happen all at once. The string lights came first, then the rug and furniture, then the pergola, then the fire pit and the privacy screen. Each year it got more functional and more comfortable.
Pick the one thing on this list that would make the biggest difference to your specific patio situation. Do that first. The momentum from getting one thing right usually carries you to the next.
And start with the string lights if you can’t decide. They’re always the right answer first.
📌 Save this to Pinterest: before you close the tab — patio season has a way of sneaking up fast and you’ll want this when it does. And if one of these actually worked for you, I genuinely want to hear what you did in the comments. Specific details appreciated.
FAQs About Outdoor Patio Makeovers
What is the cheapest way to do outdoor patio makeovers?
The highest-impact changes for the least money: power wash the surface (free if you can borrow a pressure washer — $35 to rent one for a day from Home Depot if not), warm white string lights ($35–$45 for a 48-foot set at Amazon), an outdoor rug from HomeGoods or TJ Maxx ($55–$80 for a 5×7), and a can of Rust-Oleum matte black spray paint to refinish faded or rusty metal furniture ($8). Those four things together run under $150 and genuinely change how the space looks and feels. The spray paint trick especially — old metal chairs that look like trash can look intentionally modern for $8 and forty minutes of work.
How do I makeover a small patio or balcony?
Go vertical. Wall-mounted and railing planters instead of floor pots. String lights along the railing or overhead rather than at ground level. A folding bistro table ($60–$80) that presses against the wall when you’re not using it. A small outdoor rug — even a 3×5 — under the seating to define the area and make it feel intentional rather than just furniture parked outside. The most common mistake in small outdoor spaces is buying furniture that’s individually small but collectively too much. Measure your space first and stick to one bistro set rather than trying to fit multiple seating areas.
What outdoor patio furniture is actually worth the money?
Polywood — recycled HDPE plastic that looks like painted wood — is the most durable outdoor furniture material available for residential use. It doesn’t rust, rot, or fade, requires zero maintenance, and comes with warranties up to 20 years. Expensive upfront ($300–$1,200 for a set) but the per-year cost over its lifespan beats almost everything else. For mid-budget buyers, powder-coated aluminum is excellent — lightweight, rust-proof, and holds up well in most US climates. Avoid basic steel (rusts within a few seasons) and untreated teak (beautiful but requires annual oiling or it goes grey). Whatever you buy, skip the $99 plastic patio sets from grocery stores and drugstores — they’re a false economy.
Are DIY patio makeover projects actually worth doing yourself?
Yes — for the right projects. Painting concrete, building a cinder block planter bench, hanging string lights, installing a sail shade, and building a cedar privacy screen are all genuinely achievable without advanced skills. A pergola kit with a helper and a full weekend is manageable for most people. The DIY projects I’ve done on my own patio saved me roughly $800 compared to what contractors quoted for equivalent results. The caveat: electrical work, gas lines for a permanent outdoor kitchen, and anything structural that requires a permit should go to professionals. Know your skill ceiling and stay inside it.
How long does an outdoor patio makeovers actually take?
A basic refresh — rug, lights, cushions, two plants — is an afternoon. Call it four to six hours including a shopping trip. A more involved project including new furniture, a shade structure, and a privacy screen takes two to three full weekends spread over a month. A complete transformation with a DIY pergola and painted concrete is realistically three to four weekends across a season — which is actually how most people do it anyway. One project at a time, one season at a time. The patio I have now took three summers of incremental work. It didn’t happen in a weekend. But the first weekend was enough to make it noticeably better, which gave me motivation for the next project.
What patio upgrade adds the most value to a home?
From a resale value standpoint, a permanent covered patio or pergola adds the most measurable impact — typically $5,000–$12,000 to appraised value depending on size, materials, and your market. From a pure livability standpoint, shade is the upgrade that makes people actually use the patio. Most outdoor spaces in the US go unused in summer because they’re too hot in the afternoon — a sail shade or pergola that gives real shade from noon through 4pm extends usable hours dramatically. Privacy is close second, especially in suburban settings where patios are visible to neighbors. Fix the heat and the privacy and the patio gets used. That’s the real value addition.